Tuesday, August 13, 2013

What? Skinny AND Savory? You Betcha With The Bun-less Bruschetta Burger!

30 & Curvy!
I feel like I've been on a diet my whole life...a feeling I think more than a few women can sympathize with!  "Blessed" with bountiful curves, I can't remember a time I wasn't trying to slim down with one crazy diet or another.  Slim Fast, South Beach, no carbs, juicing, you name it, I've tried it.  And while I've lost a few pounds here and there, it's never a diet I can live with and stick to, because it's just unrealistic!  So, as I've entered my 30s, I'm slowly coming to accept my curves, to embrace my goods, just as they are.  And when it comes to diets, I say I'm over that word...well, sort of.  I mean, I don't think I'll ever be able to stop my quest to lose a few L-Bs, but I've tried to focus on it as more of a healthy lifestyle change, by adapting my meals and keeping up with my exercise.  After all, I may embrace the curves, but I've got to keep them streamlined! 

All that being said, I hate to nosh on tasteless treats just to keep the calories down.  I mean, I like to EAT!  I love to settle in and enjoy a good meal...which is where the Bun-less Bruschetta Burger comes in!
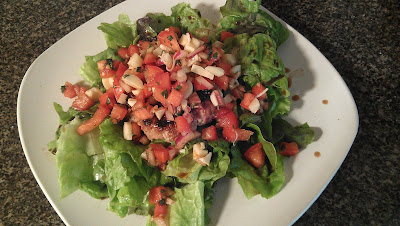
So. Good. Seriously.
The key ingredient: zucchini!  Kudos to skinnytaste.com for the original recipe, which I found courtesy of good ol' Pinterest (seriously, I'm addicted)!  Here's what you need:

I may have tasted more than a few spoonfuls...so delish
First, the bruschetta topping:
  • 1/4 cup chopped red onion
  • 1 tbsp extra virgin olive oil
  • 1 tbsp balsamic vinegar
  • kosher salt and pepper to taste
  • 3 or 4 tomatoes (I used Roma!)
  • 2 small cloves garlic, minced
  • 2 tbsp fresh basil leaves, minced (it's key the basil is fresh. Trust me, it's worth it.)
  • 3 oz mozzarella, diced (use skim to cut more cals)
Mix the onion, oil, balsamic vinegar, salt and pepper in a bowl; set aside while you chop tomatoes.  Then, add the tomatoes, garlic, and basil...and more salt and pepper if you want it!  Set aside while you work up the burgers - don't worry about the cheese yet, you'll add it right before you serve!

Onto the burgers:
  • 1.25 lbs. ground turkey
  • 1 cup grated zucchini
  • 1/4 cup breadcrumbs (I only had panko on hand, and it was fine!)
  • 1 clove garlic, minced
  • 1 tbsp. red onion, minced
  • 3 or 4 basil leaves, minced (if you don't have anymore fresh basil, dried works!)
  • salt & pepper
Basically, mash it all together.  Hands work best!  One tip, try and squeeze out alot of the zucchini juice before you add it to the mixture...you don't want it too soupy!  Once it's all mixed, form into 5 patties and sizzle them up in a pan (sprayed with cooking spray) on the stove, about 4-5 minutes on each side.

Once they're cooked, nestle one on a bed of leafy greens, maybe a few slices of tomatoes.  I added a few dashes of balsamic vinegar (I love this stuff) to the lettuce before I put the burger on...almost like it was sitting on a little salad.  Then, remember the bruschetta? Time now to stir in the cheese! Then, put a heaping scoop on top the burger, and voila!
I swear there's a burger under there...
Now, wipe your chin, where you've started drooling, and dig in!  I dare you to tell me they're not delicious.  P.S. Just 6 points for all you WW fans! Can you stand it? A whole meal for 6 points...plenty of points left for a little something sweet afterwards... ;)


Sunday, July 28, 2013

Crafty CAN Be Chic!

I'm pretty sure there's a 3rd grader still alive and well inside this recently turned 32 year old chick, because I LOVE an opportunity to pull out my scissors, glue gun and glitter and get my craft on!  Thanks to Pinterest, I'd seen my latest venture awhile back but had been waiting for a good rainy day to roll up my sleeves.  However, thanks to the streak of desert-sweltering days we've had recently, I decided to hide from the heat and settle in with my crafty ways in the safety of my air conditioning.  (My hair was pretty grateful to get a pass on the humidity, too...)  So anyway, here's what I made! 


It's a picture (duh). I'd seen this using 3 numbers, for dates that may have been memorable.  But, I went for a combo of letters that hold meaning for me.  (No, I don't LOVE the middle of the alphabet song...it's actually the first 2 initials of mine and the BF's first names and last names.  It's sort of become our nickname.  Don't roll your eyes cuz we're cheesy...you have to admit, it's kind of fun that it worked out that I'm LN and he's MO.  And, you know you'd totally do it, too!)

Want to make one of your own?  Super easy.  First, settle on your favorite combo of letters or numbers (the shorter the better, as I didn't see many frames that held more than 5 pictures). Then, collect the following items:
  • Frame that holds multiple pictures (one picture opening per number/letter - mine was $5 from Wal-Mart!)
  • Letter backgrounds of coordinating colors/patterns (scrapbook pages, wrapping paper, etc.)
  • Your favorite digits! 
Now, you could probably use pre-cut stencil letters/numbers, but because I'm super cheap, I actually printed out 4 letters in large font on plain old computer paper and cut them out using a razor blade.  I wanted four different fonts, too, so this way I could pick and choose my favorite looks!  Hint: you may need to use scissors to clean up some of the edges left from the razor, and any little white bits left hanging on...just pull out your black Sharpie and blend!


The rest is pretty basic!  Cut and tape/glue squares of your different backgrounds behind each photo opening.  Then glue your letters/numbers to the front.  I used a glue stick to avoid any lumps and seepage from good ol' Elmer's.  Pop your creation back into the frame and voila! Your own little special piece of art!  


Last step: stand back and admire your handiwork.  And, the next time you host a party, be prepared to have others admire it, too!  See, those cutting and gluing skills really stick with you... ;)  Now, I want to see yours! Post a picture, here or on my twitter, and I'll be sure to add my compliments, too!  Happy crafting!

Sunday, May 5, 2013

Out, Out, Damned Stain...Made Easy!

No, it's not a hard task, but it can be annoying and obviously, it has to be done.  Laundry.  It seems like there's always a load waiting be done.  And with my clumsiness, and the inability to eat the majority of my meals without dribbling down the front of me, there's usually some kind of stain I'm fighting to get out of my favorite shirt.  Why does it always have to be the favorite shirt??  Anyway...maybe you already know this, but here's a tip, well 2 tips, passed down from my mom and Grandma Susie, for conquering those annoying, lingering stains:

Color-safe bleach and an empty dish soap container.  Simply wash out the dish soap container when you've squeezed the last possible drop out doing those dirty dishes...and fill with your favorite brand of color-safe bleach.  Then, use the bottle of color-safe bleach to easily apply to your stubborn stain.
Check out my sweet Buffalo shirt! Many thanks to my sweetie!
To really fight those stains, try applying the color-safe beach, then letting the item soak in cold water for awhile before throwing in the washer with the rest of the load.  I'm no laundry genius, but this seems to work the majority of the time in getting out my meal mistakes. 

Speaking of Grandma Susie, she is doing so well!  She came through the double mastectomy without a hitch, and just one week later, she got an A+ from her surgeon during her follow-up visit!  I was fortunate enough to be able to go home to Buffalo for a week and help her recuperate.  I made lots of fun treats and hopefully gave her some of the support she needed to get well.  Her prognosis is good, and we're all so happy she's come through this with flying colors.  She continues to show me how strong she is, a true example of a fighter.  I hope you've taken a clue from me and her, and felt your boobies! Thanks for all your kind thoughts and prayers, they certainly paid off! 


Monday, April 15, 2013

Feel Your Boobies!

Me, Grams and Mom celebrating Grams' 80th!
Today my beloved and very brave Grandma Susie is having a double mastectomy. She's 80 years young, already a breast cancer survivor, and today she'll begin her path as a second time survivor to the disease.  Let her story, and the story of too many others, be your inspiration to stay ahead of the game! Feel your boobies!!

My Grams had a lumpectomy about 15 years ago. I still remember the day she came home after learning the doctor had found a tumor in her breast. It was a conversation of hushed tones around the kitchen table between her and my grandfather, my parents and my uncles, while my brother and I tried to understand what was happening. Why was Grandma crying? What was a lumpectomy? What did this mean for us as a family?  Thankfully, she had the tumor removed, and after several rounds of radiation was eventually pronounced in remission.  But that fear that something bad could potentially take my Grandma away has stayed with me since.

It's recommended that women begin getting regular mammograms at the age of 40.  In fact, it's rare that insurance policies will cover them beforehand.  But breast cancer can hit you at any age.  Look at Giuliana Rancic, Christina Applegate, Kylie Minogue...all diagnosed with the disease at least 3 years before the big 4-0.  And those are just the famous survivors. I'm pretty sure if you ask friends and family, someone knows someone younger than 40 who has battled the disease.  So it's up to YOU ladies to be proactive and feel yourself up!
Courtesy: CityofChicago.org
Take matters into your owns and give yourself a self breast exam. I do mine in the shower because hey, I'm already naked, and to me, the slippery smoothness of my shower gel makes it even easier to prod around and see what's happening with my rack.  But, if the shower's not for you, then here's a few other options from EHow.com that give you great step by step instructions on looking for lumps.  Now, my slightly hypochondriac side seems to always think I feel something, and maybe my doctor thinks I'm crazy for the number of times I've asked her to check out my knockers even though my appointment is just for a prescription refill, but I firmly believe in being safe than sorry.  None of my "scares" have panned out to anything, but I'd rather have that relief that I'm fine than the scare of the unknown.  And, while I haven't yet had a mammogram (still more than a few years from the big 4-0!), I do plan on telling my doctor of my maternal grandmother's second diagnosis to see if one is recommended sooner than 40 with my family history.  I have too much to do in this lifetime to not beat this before it even happens!!
Symptoms to look for! Courtesy:  CareCanCure.com
Since that lumpectomy several years ago, my Grams has been regular with her annual mammograms, and because of that, this second diagnosis of breast cancer was caught early.  Thank goodness.  Because of that, it hadn't yet spread, which means the odds of her beating cancer this time around with a double mastectomy are incredibly high. In fact, we're not believing there can be any other outcome. Tomorrow's surgery is scary, and she's losing a part of her (well, TWO parts of her) that make women FEEL like and DEFINE themselves as women.  But, she's a fighter and will be a stronger woman on the other side  I respect her for fighting this disease, I'm grateful to her for fighting this disease, and I love her more (which I didn't think was possible) for not giving up.

So ladies, feel up those luscious cans of yours on a regular basis, and if you even THINK you feel something out of the ordinary, call your doctor! And, once the mammograms start, BE CONSISTENT! Whenever you think of putting it off, think next of all those who you love and all those who love you, and let that be your incentive. You're too important to be taken down by this disease that can often be cured if caught earlier enough. Be like Grandma Susie and show breast cancer who is boss.
Just a bunch of smart, boobie-feeling blondes!

Monday, April 8, 2013

How To Be The Hit Of The Party

I'm about to let you in on one of biggest secrets. And, it's super easy. You just show up at a party with this dip:

Seriously.  We've been making this taco dip for years, and it lives up to its name every time: "Gone In A Flash Taco Dip." It's from a cookbook called "For Goodness Taste," released by the Junior League of Rochester...that's Rochester, NY, my hometown!  I think the book came out in the late 90's but, this recipe from it is as fresh as ever.  Needless to say, I've brought it to several gatherings over the years, often to a group of new friends after having moved to a new city, and let's just say, I'm pretty popular before the night is over. :)  So here's what you need:

The stuff...and the first 2 layers. Oh, and wine for sustenance.
  • Iceberg Lettuce (less than a head)
  • Green Peppers (one should work, 2 if you're a green pepper fan!)
  • White/Yellow Onion
  • Tomatoes (I prefer Roma, about 4)
  • Black Olives (I cheat and buy a can of the already chopped olives)
  • 8oz. package shredded cheddar cheese (or Mexican, taco, fiesta, etc...)
  • 8oz. cream cheese, softened
  • 8oz. sour cream
  • Jar of taco sauce
  • One package taco seasoning
1. In a bowl, mix together the cream cheese, sour cream and taco seasoning. Spread as the base on a large platter, or sometimes I use a 13x9 pan or Tupperware container if I'm transporting. On top of this goes the taco sauce, just spread it out with a spatula.

2. So this next part takes a little time.  Chop up all the veggies and layer! (See below for another secret on speeding up this process a bit...)  I generally layer in the following order: onions, green peppers, lettuces, tomatoes, black olives and the topper, lots of cheese! 

3. Grab some tortilla chips, dig in, and get ready to be praised!

Okay, so here's a few tricks of the trade I've learned over the years...  To speed up the chopping, and to avoid slicing a finger off, get your hands on this chopping genie, the Vidalia Chop Wizard.

Honestly, when I think back to the time my poor mother used to spend chopping all the veggies by hand...or when we got older, the time my brother and I spent after it was added to our list of chores...it makes this chopper invaluable.  No electronics involved, just place the veggies on the square cutting part and press down. I've used a food chopper in the past, but the veggies can get a little too chopped and there's a lot of juice to deal with.  This guy chops in two sizes, neat little bites, that collect in the container on the bottom.  Okay, you get it, I love this chopper, so I'll stop going on about it (also makes taco nights a breeze!)... But this is also why I don't measure anything.  I just chop as I go along, enough to cover each layer, so I make only as much as I want.  I usually use the small blade for all the veggies, except the lettuce, for which I use the larger blade...but that's my control freak side coming out. Use whatever size you please. :)

Oh, and it's not hard to make a low-cal/low-fat/not totally terrible for you version! After all, it's mainly vegetables. Just swap low-fat or fat-free sour cream and cream cheese to make the base, and use low-fat shredded cheddar.  While the FULL fat version tastes the best (like, duh), I've made the healthier version and honestly, there's enough flavor between the taco seasoning and the plethora of veggies, that it's still delicious. You can also serve with pita chips, or wheat thins.
How cool do the layers look?!
So that's it! Check out the sweet final product. I brought it to a get together with my boyfriend's family over the weekend, and not to toot my own horn, it was its usual hit, which always gives me a warm fuzzy. I just love bringing a little food happy to others!  Let me know if you make it, and share all that praise you receive!


Wednesday, April 3, 2013

Sweet Success!

Yum, yum, yum.
So, that's what was left. That is, after dishing it out at Easter dinner, and after the piece the BF and I had later that night as a snack... I think that makes this baking from scratch story a success! And this last piece? It's currently traveling back and forth to my lips in between writing this post.  I have to say, it was pretty delicious, and I'm quite pleased with myself! :) 

It's safe to say, I'm a big fan of dessert (a fact plain as day if you could see my hips...), but I tend to more of the decadent sweets. Your chocolate cakes, chocolate truffles, chocolate anything.  But, this was light and airy and sweet and simple and perfect for springtime!  The substitutions were unnoticeable, the cake was light but buttery, the whipped cream not too sweet, and it was a perfect balance with the strawberries.  For baking from scratch, it wasn't too much of a process, and the pay off was definitely worth it!  I declare it delicious, and sure to make an appearance at my dinner table again in the near future! Let me know if you try it and what you think!

Sunday, March 31, 2013

Baking From Scratch. Sort Of.

When it comes to the kitchen, I'm what you might call an "easy" chef. WHOA! Get your mind out of the gutter, not that kind of easy!  I mean, I don't like things to get too complicated.  I like minimal directions, ingredients that already exist in my cupboards and timely outcomes.  SO, it's safe to assume that when it comes to baking, I'm generally a cake out of a box kind of girl.  Yellow, vanilla, chocolate, funfetti...I'll try all of them, and in lots of different forms.  But, I don't usually venture into "from scratch" territory.  It goes back to a carrot cake I made (tried to make) years ago that may have wound up with several cups of salt instead of sugar... My point being, that I steer clear of those recipes that have a ton of particular measurements of a ton of specific ingredients, cuz it can get confusing fast.

That being said, I've been playing on Pinterest, looking for a light, Springy dessert to bring to Easter dinner at my boyfriend's sister's house, and I found this delicious looking Strawberry Cream Cake.  However, no box cakes involved here...it's from scratch.  And, it calls for things like whole milk, and parchment paper, and unsalted butter. I mean, do you keep that stuff in your kitchen?  Maybe you do, but I don't.  Still, it met my qualifications of having not too many steps and being not overly time consuming, so onward I went...with a few changes.  Turns out, with a little help from Google, you can substitute whole milk with other low-fat milks, like the 1% I had in my fridge.  But, I actually added a spoonful of vegetable oil to beef up the fat content (it's Easter dinner, not going for any low-cal dessert here).  As for the unsalted butter, turns out you can use regular butter or margarine, but maybe ease up on the amount of salt the recipe calls for.  And while the recipe may call for lining the pan with parchment paper, I actually had this sweet silicone pan, which I greased and floured, and figured I could peel off.  So my substitutions in place, I got to work...

Here's what it's supposed to look like:
Credit: Thanks Winona's and Martha Stewart!
And, here's how it looked going into the oven:
And, here's the final product:
 Not too shabby, if I do say so myself! I had no issues with skipping the parchment paper, the cake came right out. As for the other substitutions, I couldn't really cut into it before dinner... But, I will say the batter was pretty tasty, and the whipped topping was pretty easy to lick off my fingers, and who doesn't love strawberries??  It sure LOOKS like it will taste delicious all together, but I'll have to give you the final ruling after it gets dealt out at dinner. Fingers crossed!  And, Happy Easter! 

Thursday, March 28, 2013

A Girl's Necessities To Face The Day (Well, THIS Girl's...)

Welcome ladies and gentlemen, thanks for clicking on me! I thought I'd kick things off on my blog o'clues with something short and simple, yet VERY important... Makeup. Check those giggles, how you get your face ready is no laughing matter, am I right ladies??
My daily armor!

While I could easily spend hours playing with shadows, blushes and brushes, there are times when you just need to run out of the house. And as much as I can appreciate the "natural" look, I am not one of those lucky girls who gets to splash on some water and look radiant. I AM lucky enough to wake up with dark circles under my eyes, blotchy skin, and a few faint scar spots from squeezing a pimple or two over the years. So, relying on my long-used advice from Aunt Becky on Full House when DJ tried makeup and wound up looking like a hooker - "The best way to wear makeup is to look like you're not wearing any at all" - here are the 3 items I use as my base for more and are the least I'll leave the house without...

1. Garnier Skin Renew Anti-Dark Circle Eye Roller - This little stick is a miracle worker. It rolls on cooly, soothing those puffy eyes and masking those dark circles. It comes in a few different sking shades, creating a great base for a little concealer...IF you even need it! It runs about $10 - $12, but it lasts FOREVER! Love it.

2. Cover FX Pressed Mineral Foundation - I HATE foundation. It always feels heavy, seems to never blot on right, and with my sensitive skin, can easily lead to break outs. I picked this up at Sephora in preparation for my brother's wedding, wanting coverage that would last all day (through the dancing, crying, picture taking and eating) and look fairly natural. At about $30, this stuff is a little pricey, but SO worth it! I didn't need alot to create a smooth, even complexion, and whoa, did it last all day! Plus, it never felt like I was wearing foundation at all! Goes on like a powder and feels like nothing. (By the way, Sephora is a GREAT place to check out new stuff. I explained what I was looking for to the consultants, and they were super helpful, trying several products on me to find the perfect color and texture. I maaaaay have ended up leaving with a few other fun things...)
3. Cover Girl Professional Super Thick Lash Mascara - So, as long as I have a balanced, natural complexion, I will actually leave the house without any eye shadow, or blush, or bronzer or eye liner. But NOT without a few swipes of mascara. It just gives you the little definition you need to, in my opinion, look human. Unfortunately, a few years ago I started having major issues with mascara. Basically, shortly after applying it, I would want to claw my eyes out! No matter which kind I used, my eyes would itch non-stop, which made them water, which irritated the corners...I was a mess. Except for this stuff. It's the only kind I can wear all day without any problem. And it has to be the pink one. I don't know why, but I am doomed if Cover Girl stops making it. Thankfully, it's incredibly affordable and available in most grocery stores and pharmacies, because, like I said, I don't start my day without it.
Check out my sweet complexion
and bold eyes! And my adorable
BFF Chaddy. :)
So, there you go, the 3 items I refuse to face the world without. Makeup-wise, that is...my hair is a whole other story, perhaps in a blog post to come. But, when it comes to my Cuddleshrub mug, those are bare minimum. No one but my closest friends and family get to see the blank canvas (and unfortunately, one unlucky maintenance man who woke me up this morning...). Hopefully, my experience with them clues you into something to try...hit me up with your favorite, absolutely necessary makeup ways and woes. Maybe you can clue ME in to something fun and fabulous!